Showing posts with label baking. Show all posts

Wednesday, 31 March 2010

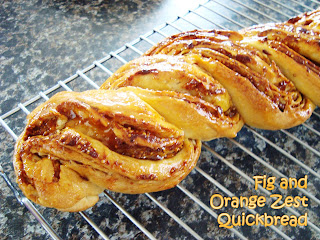
Fig and Orange Zest Quickbread


Wow, it's been almost a year since I last blogged! :O

Anyways, I got this recipe off from Nestle NZ's Hottest Home Baker show.

It was originally Fig and Aniseed, but since we don't have aniseed I substituted it with orange zest.
Didn't have any run, so I just used 1 tsp of vanilla essence instead.

It looks yum!

Ingredients:

Filling
  • 100g dessert figs, stems removed and cut very finely
  • 25ml dark rum
  • ½ tsp of aniseeds, lightly bruised with a pestle and mortar to release the flavours
  • 25 g butter, softened
  • ½ tsp cinnamon
Dough
  • 200g plain flour
  • 15g sugar
  • 15g baking powder
  • Good pinch of salt
  • 30g butter, softened
  • 100ml milk
  • ½ egg
Apricot Glaze
  • 4 tbsp apricot jam
  • 3 tbsp water

Method
  1. To make the filling mix all the ingredients together in a bowl, ensuring that the figs are not stuck together and you have a paste. Cover and set aside.

  2. To make the dough sift the flour, sugar, baking powder and salt into a large mixing bowl. Cut the butter into small pieces and, using your fingertips, rub into the flour until it resembles fine breadcrumbs. In a jug, whisk together the milk and egg and pour into the dry ingredients. Using a wooden spoon, mix together to form a soft dough. Tip it out onto a floured surface and knead for 10-20 seconds.

  3. Take the dough and shape it into a square. Using a rolling pin, roll out on a lightly floured surface into a approx 25cm square.

  4. Spread the filling evenly on top of the dough sheet, leaving about 1cm free at the bottom edge. Brush the bottom edges with the egg wash, then tightly roll up the dough to form a log, as you would for a swiss roll. Using a sharp knife, make a single lengthwise cut down the middle of the loaf and right the way through, open the lines of dough and filling to face you.

  5. Take the two strands, one in each hand, with the cut side of each strand facing up and twist them around each other. Press the ends firmly together so they do not unwind during baking. Place the twist on a baking tray lined with nonstick baking paper. Place into the preheated oven set at 210°C.

  6. Bake for approx 25 minutes. Turn the tray halfway through baking to ensure even colour.

  7. Meanwhile, prepare the glaze by placing apricot jam and water into a small saucepan and bringing to the boil, stirring constantly. Strain through a sieve.

  8. Remove loaf from the oven and brush with the hot apricot glaze before setting on a wire rack to cool.
A few more images where I didn't twiddle with the lighting on Photoshop...


Thursday, 30 July 2009

Lemon Cupcakes


I received my first ever bakebook form Static from the CNZ Forums. <3 Thank you so much.

I decided to try a recipe on lemon cupcakes. They turned out real well!

Tuesday, 30 June 2009

Measurements

Since New Zealand has a unique way of measuring ingredients for baking, I'm clarifying each measurement into metric units.
Below are the measurements used in this blog:

1 cup = 250ml
1/2 cup = 125ml
1/3 cup = 83.3ml
1/4 cup = 62.5ml

1 tablespoon = 15ml
1 teaspoon = 5ml
1/2 teaspoon = 2.5ml
1/4 teaspoon = 1.25ml


It is best to weigh your ingredients if possible, especially flour. Since the humidity each day differs it affects the volume of the flour (it absorbs moisture), and thus using a cup to measure flour would result in different quantities each time. Weighing your flour not only gives you an accurate quantity, but it can also ensure your baking is accurate, reducing mistakes. :)


Monday, 29 June 2009

Chocolate Chip Muffins


These scrumptious chocolate chip muffins are made without any cocoa. Just chocolate chips. :)

Took the recipe off Joy of Baking, modified slightly.

I reduced the butter, sugar and baking powder. Additionally, I ended up using only about 120g of chocolate chips.

Ingredients:
  • 110g melted butter
  • 2 eggs
  • 240ml milk
  • 1 teaspoon vanilla essence
  • 260g flour
  • 125g sugar
  • 1 teaspoon baking powder
  • 1/2 teaspoon salt
  • 170g chocolate chips
Method:
  1. In a large mixing bowl, whisk eggs, milk and vanilla essence together.

  2. In a separate bowl, whisk together flour, sugar, baking powder and salt.

  3. Stir in the chocolate chips. Fold the wet ingredients into the dry ingredients with a rubber spatula, along with the melted butter. Stir well until just combined. Do not over mix.

  4. Fill each muffin cup up evenly. Sprinkle some chocolate chips on top if you wish.

  5. Preheat oven at 190°C. Place in the centre of the oven for 18-20 minutes, or until a skewer comes out clean.

Sunday, 3 May 2009

Coffee Walnut Muffins

As usual, a baked product was due to be produced on every Sunday, I decided to bake some coffee muffins in an attempt to use up the rest of the instant coffee powder. Nevertheless to say, I failed. There was at lest enough left for two batches. Oh well.

As usual, I used raw sugar instead of white sugar. The sweet toothed may want to add an extra 10gs or so.

However, at the end, my batter was a bit dry, so I added water until it felt runny enough but still syrupy.

Ingredients:
Makes about 12 muffins
  • 100g butter
  • 160g sugar
  • 2 eggs
  • 30g coffee powder
  • 2 teaspoons baking powder
  • 1 teaspoon salt
  • 120ml milk
  • 120g walnuts
  • 170g flour
Method:
  1. Put softened butter in a mixing bowl. Add sugar in two additions, beat until pale and fluffy. (In my case it was until it was well incorporated).

  2. Add egg, salt, half of the milk and half of the flour, sifted. Mix until it is well incorporated.

  3. Add the rest of the milk, and then the flour. Sift the baking powder in together with the flour.

  4. Add coffee powder and walnuts, mix evenly until well distributed. Your batter should be a nice (dark) chocolate brown.

  5. Bake at 170C for 20~30 minutes.

Monday, 13 October 2008

Lemon Chiffon Cupcake!

Whooo! I baked some chiffon cake yesterday and today and put them in cupcakes instead. They turned out pretty well! Except that when it cools the top sags down so it doesn't look lovely and puffy like when it comes out of the oven. :(

The recipe is the same as Milo Chiffon Cake from Happy Home Baking, but I modified it. ;D

I omitted the cream of tartar since I didn't have any.

Ingredients:
(Makes about 24 cupcakes)
  • 3 tablespoons lemon juice
  • 1-2 tablespoons lemon zest
  • 80ml hot water
  • 8 egg yolks
  • 70g caster sugar
  • 80ml olive oil
  • 160g self-raising flour

  • 8 egg whites
  • 1 teaspoon cream of tartar
  • 100g caster sugar

Method:
  1. Squeeze the juice out of the lemon into a bowl, taking care to take the pips out. Peel the lemon zest now and add it into the juice if you wish. Sieve flour and set aside.

  2. Separate egg yolks/whites and bring to room temperature.

  3. Whisk egg yolks and sugar in a mixing bowl until sugar just dissolved. Add in lemon juice, zest, water and oil. Whisk till combined. Sieve over the flour and fold gently with a spatula until flour is fully incorporated into the batter.

  4. In a clean, dry mixing bowl, whisk egg whites and cream of tartar with an electric mixer until mixture becomes frothy and foamy. Add in the sugar in 3 separate additions while beating at high speed till stiff peaks form.

  5. Add the egg white foam into the egg yolk batter in 3 separate additions, each time folding gently with a spatula until just blended.

  6. Pour batter into separate (large) muffin cups. Bake in pre-heated oven at 170C for 25 ~ 30mins or until the cake surface turns golden brown, and a skewer inserted into the centre comes out clean.

  7. Remove from the oven and let it cool.

Wednesday, 3 September 2008

Banana Chiffon Cake

Guess what? I decided to try make the banana version of chiffon since the bananas are nice and ripe!

Recipe taken from Happy Home Baking (again!).

I would suggest for the egg whites, beat them until they start to get stiff, and then add cream of tartar or some substitute like lemon or vinegar.
Mine didn't become stiff. I think it's because I used balsamic vinegar, I guess. :(

You might to cut back on the sugar a bit, if you're not too fond of sweet things, or you have a lighter preference.

I use caster sugar for the whites and raw sugar for the yolks. It's healthier. :)

Ingredients:
  • 6 egg yolks
  • 75g caster sugar
  • 1/4 & 1/8 teaspoon salt
  • 90ml cooking oil/olive oil
  • 255g banana puree
  • 3/4 teaspoon banana/vanilla essence
  • 165g plain flour
  • 1/4 & 1/8 teaspoon baking soda

  • 6 egg whites
  • 3/4 teaspoon cream of tartar
  • 150g caster sugar

Method:
  1. Sieve together flour and baking soda, set aside. Mash banana, set aside.

  2. Separate egg yolks/whites and bring to room temperature.

  3. Whisk egg yolks and sugar in a mixing bowl until sugar is just dissolved. Add in salt, oil, essence and mashed banana. Whisk till combined. Sieve over the flour mixture and fold gently with a spatula until flour is fully incorporated into the batter.

  4. In a clean, dry mixing bowl, whisk egg whites and cream of tartar with an electric mixer until mixture becomes frothy and foamy. Add in the sugar in 3 separate additions while beating at high speed till stiff peaks form.

  5. Add the egg white foam into the egg yolk batter in 3 separate additions, each time folding gently with a spatula until just blended.

  6. Pour batter into 26cm tube pan (do not grease the pan). Spread and smooth the batter evenly with a spatula. Bang the pan gently on a work surface several times to release the air bubbles trapped in the batter.

  7. Bake for 25 ~ 30mins at 170oC, or until the cake surface turns golden brown, and a skewer inserted into the centre comes out clean.

  8. Remove from the oven and invert the pan immediately. Let it cool completely before unmoulding.

Sunday, 31 August 2008

Milky Loaf

I tried making Milky Loaf from Happy Home Baking's blog today. Since I don't have a bread machine I did it all by hand.

I didn't bother to make sure the egg was exactly 70g, but I picked an egg out of the what we had available that weighed nearest to 70g.

Since I don't like using caster sugar, I used raw sugar instead. Healthier too.

I used the block butter that's cheaper than the spreadable ones. :) However that means that it's salted. Since I only use salted butter instead of unsalted ones, the stuff I make turns out to be delicious nonetheless. Today I opened up a different brand of butter, RollingMeadow. It's so much smother and easier to cut than Classic Farm Butter. Hahahha.... I'm going to buy that brand from now on.

My mum uses Himalayan Rock Salt in cooking, so I use it for baking. It has much better texture and flavour than average table salt. Mmmm.....

Since we don't buy fresh milk (it goes off faster than we can drink it), I used milk powder instead. There's not much difference, really.

I had two 23.5cm x 13cm x 6cm loaf pans, so I cut my dough pieces into 6.


Ingredients:

  • 290g fresh milk
  • 70g egg
  • 50g (caster) sugar
  • 1 teaspoon salt
  • 1 cup bread flour/high grade flour
  • 8g yeast
  • 80g (unsalted) butter
Method:
  1. Mix milk and egg into a mixing bowl, followed by sugar, salt, bread flour and yeast. Mix evenly until you have a dough, take it out and on a clean, flat floured surface, knead for 10 minutes.

  2. Add the butter into the dough, and knead for a further 15~20 minutes.

  3. Flour the mixing bowl you had before, put the dough in, and cover with a damp cloth. Let it rise for an hour or so, or until double in size.

  4. Remove the dough onto a clean, flat floured surface. Punch out the gas, and knead very gently for a bit, until most of the gas is out.

  5. Cute your dough int 3 or 6 equal pieces, depending on the size(s) of your loaf pan. Roll into a round ball, and let it 'relax' for 15 minutes. This is so the dough will be easier to roll out and be shaped.
  6. On a lightly floured surface, flatten one piece of dough and roll out into a long oval shape. Roll up the dough swiss-roll style. Do the same for the remaining doughs.

  7. Flatten the rolled-up dough and roll out again into a long rectangular shape. Roll it up tightly, and roll it as much as you can (one revolution wise), swiss-roll style for the second time. Do the same for the remaining doughs.

  8. Place the doughs in lightly greased/non-stick bread tin/pan. Let the doughs proof for the second time, until it fills up 80% of the tin/pan. Cover it with a damp cloth, or Gladwrap.

  9. Bake in a preheated oven at 180-190C for 30-35 minutes.

  10. Take the bread out of the pan immediately when removed from the oven. Let it cool completely before slicing.

Thursday, 28 August 2008

Mantou!

Ingredients:
  • Flour (all-purpose)
  • Water
  • Warm water
  • Raw sugar
  • Brown sugar (the unrefined one)
  • 1 teaspoon Yeast
For Poolish:
  • 1 cup flour
  • 1 cup warm water
  • 3/4 teaspoon sugar
  • 1/2 teaspoon yeast

Last night I prepared some poolish for mantou (steamed buns) that I was going to try and make today.

Unfortunately, we don't have a recipe on the amount of flour and water, so me and my mum improvised.

First, we spread a whole lot of floor on the bench, and chucked our poolish on top.
Knead knead.
Added more flour and made a little well in it, where we poured the water in (yeast and some sugar was dissolved first).

Knead knead, until it was a ball of dough.

Now, for the sugars!!! Add raw sugar to taste, and some brown sugar in the middle of the dough (make a hole first). Knead until the colour is evenly spread out.

Keep adding brown sugar until the dough's a nice caramel colour.

Now, for the muscle training part. :/

Knead, knead, knead, until the lactic acid in your muscle builds up.
You have to knead until it's quite soft.

Set aside, cover with a damp cloth and let it rise for 4 hours, or until double.

------

After our dough almost raised the roof, We spread a WHOLE LOT of flour on the bench again.
Now, for more kneading!!! Yaaaaay!!!

Knead until high gluten has developed. You can test this by using the "window pane" method. Click here for an explanation and photos.

Roll the dough into a fat, long snake.
Cut it into sections, depending on how big you want your mantou to be.

I made some square ones and round ones and rolled up ones. :)

Now, set it aside to proof for another 20-30 mins or so. You may cover it with a damp cloth if you wish.

I haven't steamed it yet, I'm typing this as it's proofing. I'll finish it when we've steamed it!!!

--------

Mum steamed the mantous in a zhinrong... the round bamboo basket things.
They came out BIIIIIIIIIIG and lovely. Big yeast holes. I think I put too much yeast in... next time I'll reduce it to 1 teaspoon. Hopefully it won't have so much holes next time.